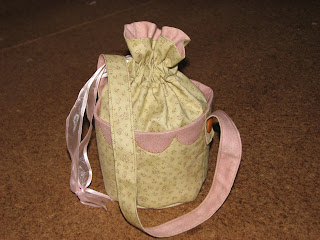
Today I made a mug bag, this is a birthday present for a friend of mine.
The pattern was a Hatched and Patched pattern, Kylie told me they went together pretty easy but I still put off making one - turns out she was right! Even the circular base wasn't a drama and usually I avoid these like the plague! I bought these fat quarters from Cottage on the Hill a couple of years ago; so pretty....
This gorgeous bundle has been partially cut and in very slow progress. I pulled it out the other week and now have the top together and it is all basted ready to quilt. This was Lynda's helpful suggestion; baste as soon as possible after completing a quilt top to try to avoid the top collecting dust. I am good at procrastinating over quilting quilt tops; currently there are 7 waiting to be basted plus two basted in the last week or two. I am sure Lynda's suggestion is going to help me.
This is the quilt from the bundle. It is made from two Hemming House jelly rolls, only the two jelly rolls. The centre square is pieced from two 4 1/2" strips. I kept aside strips for the binding and only had to purchase backing in addition to the jelly rolls I bought from Sarah ages ago. I loved the colours in this range, the blue/teals in particular so I chose these to be the square centres and the binding. Strip wise and colour wise this worked out well. The quilt is 64" x 80"; it was almost 64" x 72" as I didn't have enough blocks for another row; I needed two more. I didn't want to not use all my blocks so I pieced two patched blocks from the offcuts/scraps (you can see a black one in the middle bottom of the photograph) to get that extra row. There is very little wastage from the jelly rolls, mostly small pieces that are less than 4 inches long - I was so pleased as this quilt was a challenge to myself. Actually that's how long this quilt has been in the works; I was working out the mathematical side (how big to make the squares and how to divy up the colours) in between dumping truckloads of rubble off up the paddock while Mr Busy was on the traxcavator. I had most of the kids in the truck with me and would fiddle on paper while waiting for the truck to be loaded, Feb 2009.
I played with words for this quilt and called it 'He Ming Hos'!
To update, I am still slowly hand stitching Butterfly Garden and My Town. I have half of the rows for Floral Boquet Sunkissed together. This weekend I am doing a leadlighting course (again! they are fun) so will have a lightshade to show you next week. I made one of these last year and it is easy to see why this craft gets addictive!


8 comments:
What a very sensible and affordable way to create a quilt...well done...like you, I love the teals in it...a.great match with the red.....how will you quilt this now?...I do a lot of planning and sometimes stitching while waiting for the school bus....busy people need to use every bit of time they can for pleasure, I reckon. Lovely mug bag...all of Anni's designs I've ever made have been simple and fail-safe to follow....
Bec i love the little bag you made its so pretty and your quilt is looking great,well done
I leadlighting like stained glass? No matter it sounds fun. The quilt is terrific. Thanks for sharing Lynda's tip, I'll have to remember (and practice) it.
The quilt top looks great Bec - remember after all that basting you have to get around to quilting - don't want those pins going rusty - I'm a nagger, aren't I? What a pretty mug bag - your friend is going to be so pleased.
Your quilt top is gorgeous and very very effective - I love your idea of using the teals and blues in the centre. And good on you for getting it past the basting stage!
Your quilt top looks really lovely, Bec. Love the teal and blue centres - great choice :)
Very nice Bec - very quick and very easy xxxx
The little bag you made its so pretty! I love your idea of using the teals and blues in the center.
Silver MLM
Post a Comment